
Welcome to the BALANCE tool, the heart of the calculator and one of the most useful features.
This is an updated version of this tutorial for version 1.31 of the calculator.
What is ice cream balancing?
A balanced recipe means that the properties of the ice cream has been balanced to give you an ice cream with good texture and taste. Exactly what these properties are depends on your personal preferences and the type of ice cream you make. A badly balanced ice cream usually has one or several problems with texture and taste.
So, when developing a new flavor, you should always make sure it is balanced correctly. If you make an existing recipe, you can also use the balance tool to adjust it if it is unbalanced.
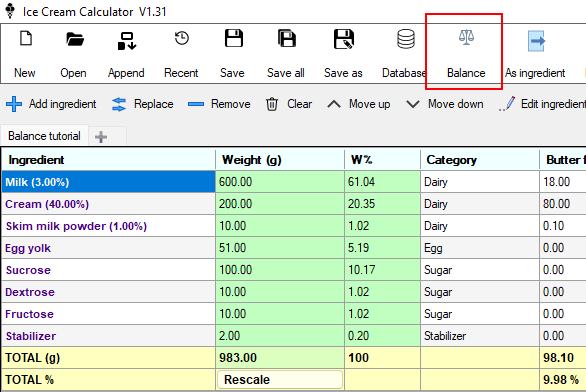
Ingredients
This is where your ingredients are listed.
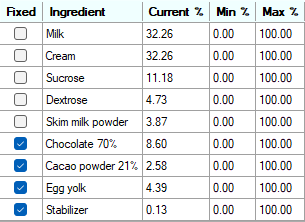
Here you control what ingredients you want to include in the balancing and the min/max amounts of these ingredients. Ingredients with small weights will automatically be set as Fixed meaning they will not be changed by the balancing. Also, ingredients from the Egg category will be set to Fixed.
The Fixed checkbox will exclude an ingredient from the balancing. This is very important!
You should exclude all flavor ingredients and stabilizers etc. For example you make a chocolate ice cream and have decided to add 100g of chocolate. Now, you don’t want the balance tool to change the amount of chocolate. In the worst case the balance tool could set the weight to 0 and it wouldn’t be a chocolate ice cream anymore.
So, important! Make sure you check the Fixed checkbox for ingredients that should not be changed.
You can also set a Min/Max range for individual ingredients. This can be useful if you want to limit the amount of a certain ingredient. You could for example set Skim milk powder to 10%-30% or Egg yolk to 34%-68% limiting Egg yolks to 2-4.
The result of the balancing is shown in the Result column. At the end of each row, you also have two buttons. These buttons will decrease and increase the weight of that ingredient. This is very useful to manually adjust the recipe. You can also manually change the value in the result cells.
If you make any changes manually or with the buttons, small arrows in the target area will indicate how the target data changes. This is also very useful to see how the properties change when changing one ingredient.

Chart
Below the ingredients you have a chart to be able to see more info about the changes. Right-Click to change chart.

Balancing
This is where the actual balancing is performed.
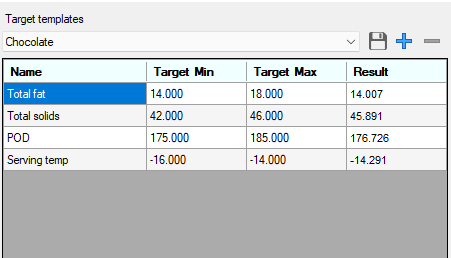
You first select a target profile from the Target templates list. There are a few predefined templates in this list. Ice cream, Gelato, Sorbet, Chocolate and Nutrients. These predefined profiles are a good starting point. You can also add your own profiles by using the buttons to the right of the list. When you get more comfortable with balancing you will probably add your own profiles that reflects your style of ice cream.
When selecting a profile, the target data is shown in this list.
You have a Min and Max target for each data value. So, in the example above the Total fat should be between 14% and 18%.
You can add and remove data from this list using the buttons below the list. When adding data you can choose from all available data in the calculator.
This gives you unlimited options of how to balance your ice cream. For example, the Nutrient profile will add target data to be able to reverse engineer an existing ice cream from its nutrient label.


Balance
When you have set up your target data just press Calculate to perform the balancing.
As we can see all targets are inside the ranges.
Current button
Pressing the current button will copy the properties from the recipe to the list of targets. This is useful if you want to tweak something. For example, you are happy with the recipe except you would like it a little bit sweeter. Then you can press the Current button and then change the POD.
Reset button
The reset button will reset everything and load the original recipe again.
The Expand button
This will modify the Min/Max values in the target list by taking the average of these values and then set the Min and Max to 2% from the average.
The average Min/Max button
This will set the target values Min/Max to the average of these values. So after you press this button the Min and Max will be the same.


Examples
So, lets look at some examples.
This is a pretty unbalanced recipe.
We make sure the Fixed checkbox is checked for the Stabilizer and Egg yolks. Then we select the Ice cream profile from the Target template list and press Calculate.
As we can see the recipe is now much better.
If we like we can now tweak the settings and balance again until we are happy with the result.


Problems
The balancing might not always be able to balance the recipe to reach all the target data.
There are several reasons this can happen.
There might be to few ingredients in your recipe. For example, if we have a recipe without Skim milk powder and with only Sucrose as the only sugar it will be hard to control both the Total solids and Sweetness (POD).
The target data can also be mutually exclusive. This means that one target might be impossible to have together with another target. For example, if we set the Total fat to 30% and the Total solids to 20% that is of course impossible.
To solve problems, you can either modify the targets and their values and/or add more ingredients to make the balancing possible.
Let’s change the recipe and remove the Dextrose and Fructose and try balancing again.
As we can see we could not reach the Total solids target.
We now add back Dextrose to the recipe and see what happens.
Now it was possible to reach all our target data.


Tutorial 1
In this first tutorial we will select a base and add chocolate to turn it into a chocolate ice cream.
Start the calculator and press the New button and select Soft base.
Now we press the Add ingredient button and add Chocolate 70% and Cacao powder 21%.
Set the weights to 100g for the Chocolate and 30g for the Cacao powder.
Now press the Balance button to open the Balance dialog.
First check the Fixed checkbox for the Chocolate and Cacao powder because we don’t want the balancing to change the amount of chocolate.
Now in the Target templates list select Chocolate.
Here we see that the Total fat and Total solids are too high.
Press the Calculate button to balance the recipe.
After balancing we can see that both Total fat and Total solids are inside the target ranges.
Press OK to update the recipe and return to the main calculator page.
DONE!


Tutorial 2
In this second tutorial we will use the same base and chocolate as in Tutorial 1.
The idea here is to show how to use a base that you really like and add something to it, then balance the new recipe to have the same properties as the base.
Start the calculator and press the New button and select Soft base.
The first thing we do is to press the Compare button. We do this to be able to use the properties from the Soft base when balancing. So, press the Compare button.
Now we have added the Soft base as our Compare recipe and this can be used in the balancing later.
Now we press the Add ingredient button and add Chocolate 70% and Cacao powder 21%.
Set the weights to 100g for the Chocolate and 30g for the Cacao powder.
Now press the Balance button to open the Balance dialog.
First check the Fixed checkbox for the Chocolate and Cacao powder because we don’t want the balancing to change the amount of chocolate.
We also uncheck the checkbox for Egg yolk and adds 2% to Min and 4% to Max. This will limit the amount off Egg yolks used.
Now in the Target templates list select Ice cream.
We want the new recipe to have similar properties as the Soft base so we press the Compare button to set the Target values to the same as Soft base. Then press the Expand button to create a Min/Max range for our target values. It should now look like this.
What we will do is to remove the MSNF/Water target from the list. Select MSNF/Water and press the “-” button to remove it. We do this because the chocolate will add a lot of solids so it will be hard to reach both the Total solids target and the MSNF/Water target when we add chocolate.
Press the Calculate button to balance.
Ok, Total solids are still a little to high. This is typical with chocolate ice cream and we are still pretty close to the Soft base properties.
We can look at the chart and compare.
Press OK to update the recipe and return to the main calculator page.
DONE!


Summary
The balancing tool is very powerful and useful. I suggest you play around with it and learn how to use it. There are endless possibilities to tweak your recipe to have the properties you like. It’s also much faster and simpler than trying to manually change the weight of your ingredients.
Hey Boss,
Can we use the balancing software for sorbet as well ?
Yes
I would like to make a recipe with Greek Yogurt, however yogurt is not an available ingredient on the calculator.
I have tried looking online but cannot find information showing NFMS etc needed for balancing. Do you know how I can find this information?
Just use the Nutrition label dialog and input the nutritional values from the package. Then check the dairy radio-button and press OK.
Brilliant, thank you!
Amazing work thank you soooo much !!!
Thank you so much Boss .
Looking forward to your tutorial
Sorry for that. The post is now updated with a proper tutorial at the end of the post 🙂